PhotoRec Free Download for Windows PC
Download PhotoRec 7.2 for Windows to recover deleted photos, documents, archives, and video files from hard drives, SSDs, USB drives, and memory cards.
-
EFI System 2048 sectors / FAT32boot
-
Microsoft basic data NTFS / Users / Picturesselected
-
SDXC Card exFAT / camera-importremovable
What is PhotoRec?
PhotoRec is a free file recovery utility from CGSecurity that scans storage media at a low level and pulls back files after deletion, corruption, or formatting.
PhotoRec is built for one job: finding lost files when the usual folder view no longer helps. Instead of relying on the damaged filesystem, it reads the raw data on a drive and looks for known file signatures. That approach makes PhotoRec useful after accidental deletion, partition damage, virus cleanup, or a quick format that wiped directory records but left the underlying file data in place.
The project comes from CGSecurity and is maintained by Christophe Grenier, the same developer behind TestDisk. PhotoRec often ships alongside TestDisk, but it focuses on recovery by file type rather than partition repair. On Windows it is commonly used to recover photos from SD cards, office files from USB drives, or media pulled from external disks. The same recovery engine is also available on Linux, macOS, the BSD family, Solaris, and older Windows releases, which makes PhotoRec a practical option when you need the same tool across mixed machines.
There is a text-based interface for direct control and QPhotoRec for people who prefer a graphical front end. Both rely on the same recovery logic. The important detail is safety: PhotoRec scans the source media in read-only mode, then writes recovered files to another destination. That keeps the original drive untouched during analysis, which matters when every overwritten sector reduces the chance of a clean recovery.
-
File carving instead of directory repairPhotoRec looks for known file headers and trailers, so it can recover data even when the original folder structure is gone.
-
Broad media supportIt works with hard drives, SSDs, USB flash drives, memory cards, and disk images across FAT, NTFS, exFAT, ext, HFS+, and other filesystems mentioned in the official documentation.
-
Large format coverageOfficial documentation lists more than 480 file extensions in roughly 300 file families, which covers far more than photos despite the name.
-
No license costPhotoRec is open source under the GNU GPL, so the full recovery engine is available without trial limits or paid unlocks.
Why PhotoRec still earns a place in serious recovery kits
PhotoRec is built for damaged storage, accidental deletion, and messy recovery jobs where normal undelete tools fail. Instead of trusting the old filesystem metadata, it scans the media itself, identifies known file signatures, and gives you practical controls to keep the recovery run focused. That design is why technicians still keep PhotoRec around for SD cards, USB drives, and reformatted partitions that simpler recovery apps often misread.
Signature-based recovery
PhotoRec recovers files by reading known file headers and internal patterns rather than depending on a healthy directory tree. That matters when partitions have been reformatted, the filesystem is damaged, or the drive no longer mounts cleanly.
Wide file type coverage
The official documentation lists more than 480 file extensions across about 300 file families. That gives PhotoRec reach beyond photos alone, with support that extends to documents, archives, audio, video, and many raw image formats.
Read-only scanning
CGSecurity notes that PhotoRec uses read-only access while it scans the source media. The tool reads what is there, then writes recovered files somewhere else, which lowers the risk of turning a bad recovery situation into a worse one.
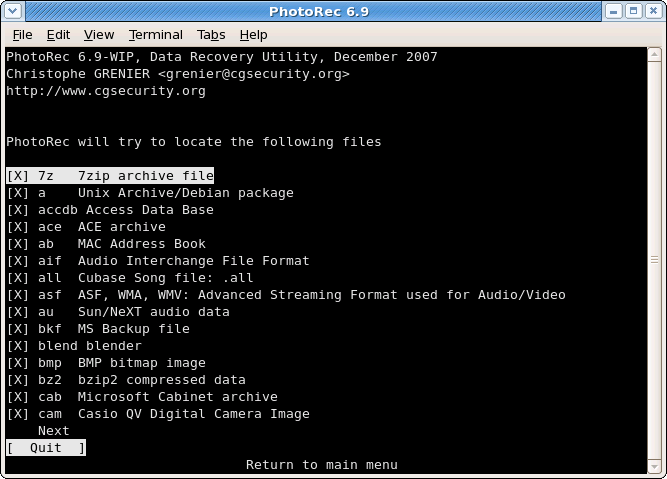
File family filters
You can open File Opt and disable file families you do not need before starting a search. That simple control keeps results tighter, cuts down duplicate noise, and helps when you are hunting for one specific group of files from a crowded disk.
Works across common filesystems
PhotoRec is documented with FAT, NTFS, exFAT, ext2, ext3, ext4, HFS+, and ReiserFS among its known targets. In practice that makes it useful on camera cards, Windows PCs, Linux systems, and mixed external drives that move between machines.
Broad platform support
The package is available for modern Windows releases, Linux, macOS, and several BSD and Solaris environments. If your recovery workflow spans old workstations, live USB sessions, or server hardware, PhotoRec usually fits without special licensing friction.
Fast text-mode workflow
The main interface is keyboard driven and direct. Once you know the sequence of disk selection, partition choice, file options, filesystem choice, and destination folder, PhotoRec lets you move through recovery tasks without waiting on a heavy graphical shell.
QPhotoRec for GUI users
Not everyone wants a terminal-style interface during a stressful recovery job. The same package also includes QPhotoRec, which gives PhotoRec users a graphical option while keeping the underlying recovery engine and file carving logic familiar.
Free and open source
PhotoRec is released under the GNU GPL v2 or later, so there is no paid recovery wall hiding basic functions. You can inspect the tool, keep it in a field toolkit, and use it on emergency jobs without dealing with trial limits or recovery caps.
System requirements for PhotoRec
PhotoRec does not publish a heavy hardware checklist because the program is small, text based, and designed to run on a wide range of systems. The table below keeps the official platform support in the minimum column, then adds a practical recommendation for smoother scans and easier file review when you use PhotoRec on current hardware.
| Component | Minimum | Recommended |
|---|---|---|
| Operating system | Windows Vista or Windows Server 2008 and later for the current Windows build, macOS 10.6 or later, or Linux x86_64 with kernel 2.6.18 or later.Older DOS and Windows 9x support exists in the broader project history. | Windows 10 or 11, recent macOS on Intel or Apple Silicon through compatibility, or a current Linux distribution with up to date storage drivers. |
| CPU | No official CPU floor is listed beyond the processor support implied by the operating systems above. | A modern 64 bit dual core or better helps PhotoRec scan large SSDs and memory cards with less waiting during long recovery sessions. |
| Memory | The official documentation does not publish a RAM target for PhotoRec. | 4 GB RAM or more is a sensible working baseline if you plan to keep PhotoRec open while sorting recovered files in another app. |
| Disk space | About 26.1 MB for the Windows 64 bit zip package, plus extra free space on a separate destination drive for recovered files. | Use a second drive with more free space than the data you expect to recover. That matches PhotoRec guidance and avoids overwriting the source media. |
| Display | Any display that can comfortably show the text interface is enough. | A 1280 pixel wide display or better makes partition lists, file family filters, and destination paths easier to review during a PhotoRec run. |
| Network | No network connection is required to run PhotoRec after download. | Use a normal internet connection only for downloading PhotoRec, reading the manual, or fetching the latest package from CGSecurity. |
Download PhotoRec
PhotoRec ships inside the official TestDisk archive from CGSecurity. Every link below points to the official CGSecurity download server. Pick the build that matches your operating system.
The 64-bit Windows package is the right choice for most people. The zip contains PhotoRec, QPhotoRec, and TestDisk. Extract the archive, right-click photorec_win.exe, and run as administrator to scan physical drives.
If your machine only supports 32-bit Windows (Vista or later), use this build. Same PhotoRec tools, just compiled for 32-bit processors.
The Linux archive works on most x86_64 distributions. Extract and run with sudo for physical disk access. Many distros also carry PhotoRec in their official repos (apt install testdisk).
The macOS build targets Intel Macs directly. Apple Silicon (M1/M2/M3) systems run it through Rosetta 2 compatibility. Grant Terminal full disk access in System Settings before scanning.
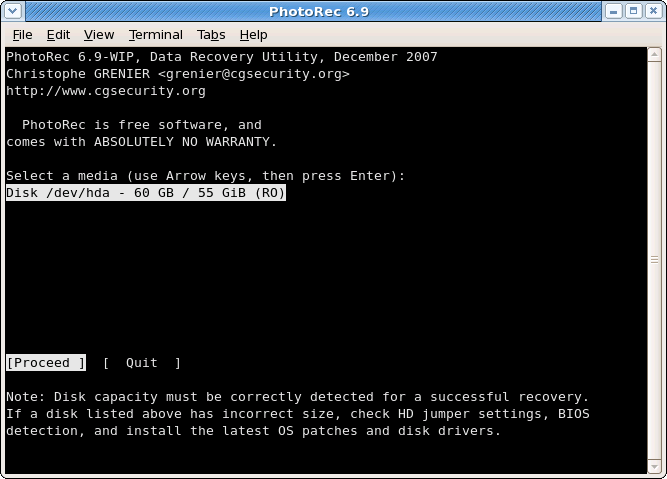
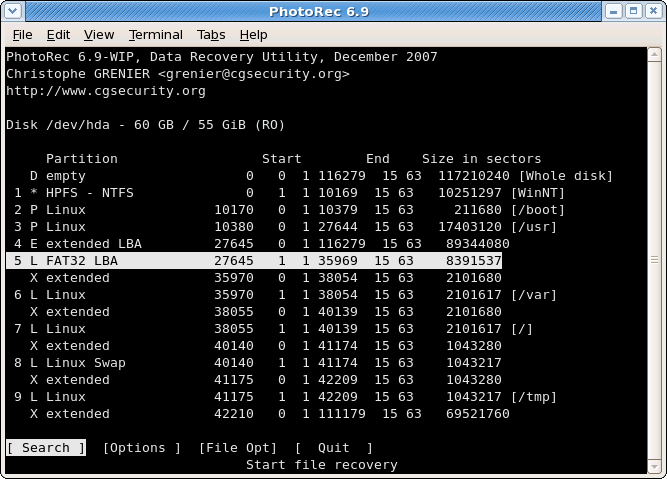
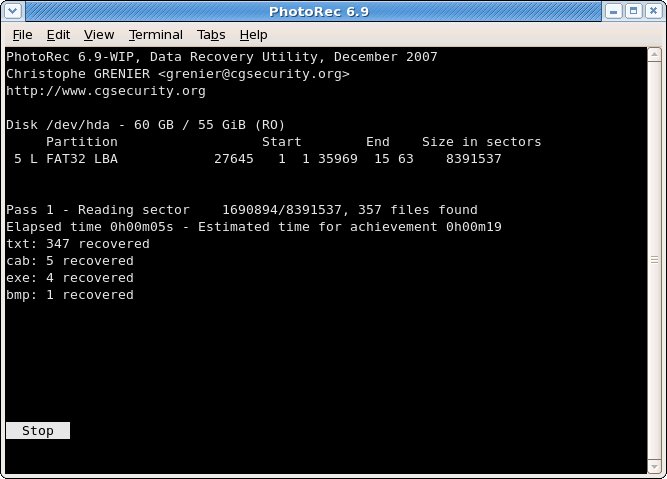
See PhotoRec in action
These PhotoRec screenshots show the real recovery flow: startup, source selection, file family filters, and a live recovery pass. PhotoRec keeps the interface plain, but that is the point. You can inspect what PhotoRec is doing before you run a scan.
Getting started with PhotoRec
PhotoRec is simple once you know the order of operations: download the right build, keep the source drive untouched, narrow the file types, and recover to a different location. This guide walks through that path in the same practical, documentation-first style as the rest of the page.
Downloading PhotoRec
Use the download section on this page and stay with the internal anchor at /#download. That keeps you on the packaged build intended for this site and avoids the usual confusion around mirrored archives, old beta links, or third-party installers.
Most people should pick the stable build first. Stable is the safe choice when you are trying to recover family photos, work documents, or a damaged USB stick and you want predictable behavior. The beta build exists for testing newer hardware support and fixes, but it is better treated as a fallback when the stable branch cannot read your media cleanly. On Windows, choose 64-bit unless you are maintaining an older 32-bit system. On macOS, the Intel package still matters because many Apple Silicon systems run it through compatibility mode. Linux users usually work with the generic archive or the package shipped by their distribution.
Pay attention to the archive format before you click. A zipped `.exe` package usually gives you a portable folder. An `.msi` file is more likely to run a standard installer with shortcuts and an uninstall entry. A `.dmg` mounts like a disk image on macOS. An `.AppImage` is a self-contained Linux app that often needs `chmod +x` before launch. Portable builds are useful when you are helping someone from a USB drive. Installer builds are cleaner when PhotoRec will stay on the machine.
Installation walkthrough
PhotoRec is distributed inside the TestDisk package, so installation is more about unpacking correctly than chasing a long setup wizard. Keep the recovery tool on a healthy drive, not on the card or disk you want to scan.
- Windows: download the archive, extract it to `C:\Tools\PhotoRec` or another safe folder, then open `photorec_win.exe`. If you received an `.msi`, run it, accept the destination path, and leave optional desktop shortcuts enabled only if this is your own machine.
- macOS: open the `.dmg`, drag the application or extracted tools folder into `Applications`, then approve the first launch from System Settings if Gatekeeper blocks an unknown developer prompt.
- Linux: extract the archive into your home directory or recovery toolkit, then launch PhotoRec from a terminal. If you are using an AppImage, mark it executable first.
Common installation options are mostly boring, which is a good thing. A destination folder only controls where the tool lives. Start menu and desktop shortcuts matter for convenience, not recovery quality. File associations are usually not relevant because PhotoRec works on devices and partitions rather than on individual file types. On first launch, expect either the text-mode PhotoRec interface or QPhotoRec if you opened the graphical wrapper. The text-mode version is the one most guides document, and it is still the clearest path when you need full control over partitions, file families, and output folders.
Initial setup and configuration
Your first real decision inside PhotoRec is not the scan button. It is scope. Start by selecting the correct physical disk, then choose the partition that matches where the deleted files lived. If the filesystem is damaged and labels look strange, double-check capacity and partition size before moving on. One wrong pick can waste hours.
Next, open File Opt and trim the recovery list. PhotoRec can search through hundreds of extensions, which is useful but not always smart. If you only need JPEG, MP4, DOCX, and PDF files from an SD card, disable the rest. The scan will be easier to review and usually faster. Then visit Options and confirm the output settings, naming behavior, and low-level recovery choices. In the text interface, the bottom action bar tells you what key moves where, so it is worth slowing down for thirty seconds before you start pressing Enter.
There is no flashy first-run wizard, and that suits the tool. What you do get is a reliable sequence: device, partition, file types, filesystem hint, then destination folder. If you are moving from another recovery tool, there is no import function for prior jobs. Treat each PhotoRec session as a fresh case file. Write down the source disk, the file families you enabled, and where recovered data will be saved. That small habit helps when you need a second pass with narrower settings.
Set this immediately
Choose a destination folder on another disk with plenty of free space. Recovered files can consume more room than expected because PhotoRec writes everything it finds, not just the files you hoped to recover.
Skip this mistake
Do not leave every file extension enabled unless you actually need everything. A broad scan creates more duplicates, more unnamed results, and more cleanup work later.
How to use it: core workflow
The main job of PhotoRec is file carving. It does not rely on the original directory structure being healthy. Instead, it scans raw media for known file signatures and rebuilds whatever it can. That is why it can recover data even after a format or a damaged filesystem, but it also explains why recovered filenames and folders are often generic.
A normal recovery session goes like this. Connect the damaged drive or memory card. Launch PhotoRec. Pick the physical disk with the arrow keys. Select the partition that held the missing files. Open File Opt and keep only the file families you care about. Choose the filesystem type. For most Windows, exFAT, and camera cards, Other is the right choice. For Linux ext partitions, choose the ext option when you know it is correct. Then decide whether to search free space only or the whole partition. Free space is faster when files were simply deleted. Whole partition is slower, but it is often the better choice after formatting or severe corruption.
When PhotoRec asks for a destination folder, stop and verify you are writing to another drive. Press C to confirm the folder and start the scan. Progress updates appear live, including how many files were found and where they are being written. On large disks, let it run. Interrupting early can be fine if the missing items already appeared, but most users quit too soon and then wonder why the document they needed was not there. Once the scan finishes, sort the recovered output by file type or date and review the results in batches.
Tips and best practices
Start with the least invasive move: stop using the source drive, connect it through a stable adapter, and recover to another disk with more free space than you think you need. On slower media, narrow the file families first and use a direct USB connection instead of a flaky hub. If the drive is physically failing, make an image before repeated scans. PhotoRec is read-only on the source, but repeated hardware disconnects can still turn a recoverable case into a dead one.
The biggest pitfall is impatience. Users often scan the wrong partition, save recovered files back to the source, or leave every extension enabled and drown in output. Avoid all three. Another useful trick is running one focused pass for photos, then a second pass for office documents if the first results are noisy. That gives you cleaner folders and less manual sorting. Official documentation and community notes are still the best help channels when a scan behaves oddly, especially for unusual filesystems and partition maps.
PhotoRec frequently asked questions
Answers to the questions people ask most when installing PhotoRec, scanning a damaged drive, or picking between recovery tools.
Install and setup
What is PhotoRec used for?
PhotoRec is a file recovery tool that scans storage media for known file signatures, then rebuilds what it finds into usable files. It was built for situations where the normal file system no longer works: accidental deletion, a corrupted partition, a formatted SD card, or a drive that simply stopped mounting.
The name suggests photos, but the tool handles far more than images. The official documentation lists over 480 file extensions across roughly 300 file families, covering office documents, compressed archives, audio clips, video files, raw camera formats, and database exports. Recovery depends entirely on whether the original data blocks are still physically present on the media. If new files have already overwritten those blocks, no tool can bring them back.
PhotoRec reads the source disk in read-only mode during the scan, which means it does not write to the drive it is analyzing. Recovered files go to a separate destination you choose before starting. That design makes it safer than tools that attempt in-place repair, especially when you are dealing with a drive that might fail mid-operation.
Does PhotoRec have a normal Windows installer?
No. The official download is a zip archive, not a setup wizard. Inside the zip you get several executables: photorec_win.exe (command-line interface), qphotorec_win.exe (graphical interface), and the TestDisk binaries. Extract the archive to any folder, then run whichever executable you need. No registry entries, no start menu shortcuts, no uninstaller required.
This portable design is actually an advantage for recovery work. You can put the extracted folder on a USB stick and carry it between machines without installing anything on the damaged system. Many data recovery professionals prefer portable tools because installing software onto a drive you want to scan risks overwriting the deleted files you are trying to recover.
If you want a quick way to launch it, just create a desktop shortcut to photorec_win.exe or qphotorec_win.exe yourself. Run it as administrator if you need access to physical drives rather than just partitions.
Should I use PhotoRec or QPhotoRec?
PhotoRec is the command-line, keyboard-driven interface. It gives you full control over partition selection, file system hints, file family filters, and scan mode (free space only vs. whole partition). If you are comfortable navigating menus with arrow keys, this is the more flexible option.
QPhotoRec is the graphical frontend that ships in the same package. It wraps the same recovery engine in a point-and-click window. You pick the drive, select file types from checkboxes, choose a destination folder, and click Search. It skips some of the lower-level partition controls that PhotoRec exposes.
For most home users recovering photos from an SD card or files from a USB drive, QPhotoRec is the easier starting point. For technicians who need precise partition control or who run recovery from a live Linux environment without a desktop, the command-line PhotoRec is the better pick. Both produce identical recovery results because the file carving engine is the same.
Can I run it on Windows 11 and older Windows versions?
Yes. The current 64-bit Windows build works on Windows 11, Windows 10, Windows 8.1, Windows 8, Windows 7, Windows Vista, and the corresponding Windows Server editions (2022, 2019, 2016, 2012, 2008). A separate 32-bit build is available for older machines that cannot run 64-bit software, with a minimum requirement of Windows Vista or Windows Server 2008.
In practice, any machine running Windows 7 or later should work without issues. If you are on Windows XP or something even older, check the CGSecurity download page for legacy builds or consider booting from a Linux live USB instead. PhotoRec on Linux has fewer compatibility concerns with aging hardware.
How do I run PhotoRec as administrator on Windows?
Right-click photorec_win.exe (or qphotorec_win.exe) and select “Run as administrator.” Without admin rights, PhotoRec can only see logical drive letters. With admin rights, it can also access physical disks directly, which matters when a partition is damaged or missing from the drive letter list.
If you are scanning an external USB drive or SD card, admin access also ensures PhotoRec can read every sector rather than being blocked by permission restrictions. On Windows 11, you may get a SmartScreen warning the first time because the executable is not code-signed by Microsoft. Click “More info” then “Run anyway” to proceed. The file is safe as long as you downloaded it from the official CGSecurity source.
Recovery features
What kinds of files can PhotoRec recover?
The official documentation lists more than 480 file extensions grouped into about 300 file families. That covers the common categories most people need:
- Images: JPEG, PNG, GIF, BMP, TIFF, RAW formats from Canon (CR2/CR3), Nikon (NEF), Sony (ARW), and others
- Documents: PDF, DOCX, XLSX, PPTX, ODT, TXT, RTF
- Archives: ZIP, RAR, 7Z, TAR, GZ
- Audio: MP3, FLAC, WAV, AAC, OGG
- Video: MP4, AVI, MOV, MKV, WMV
- Database and misc: SQLite, PST (Outlook), EML, and various system file formats
Recovery success depends on whether the file data is still physically on the disk. If the operating system already wrote new data over those sectors, the file is gone regardless of the tool you use. That is why the single best thing you can do after data loss is stop using the affected drive immediately.
Does PhotoRec work on SSDs, USB drives, and memory cards?
It works on all of those, but results vary by device type. Traditional hard drives (HDDs) tend to give the best recovery rates because deleted data stays on the platters until something else writes over it.
SSDs are trickier. Most modern SSDs run a background process called TRIM that tells the drive to erase deleted blocks for performance. Once TRIM runs, those blocks are zeroed out and no recovery tool can bring them back. If you catch the deletion quickly (before the next TRIM cycle), recovery is possible. On some SSDs with TRIM disabled or on encrypted drives, results can be unpredictable.
USB flash drives and SD cards are the most common recovery targets. They typically do not run TRIM, so deleted files tend to stick around until overwritten by new data. PhotoRec works well here, especially for camera cards where the file format is consistent (mostly JPEG and RAW).
For any storage media: the less you use the device after data loss, the better your chances. Eject it, set it aside, and run PhotoRec from a different computer if possible.
Which file systems are supported?
PhotoRec is documented to work with FAT12, FAT16, FAT32, exFAT, NTFS, ext2, ext3, ext4, HFS+, and ReiserFS. But here is the thing that makes PhotoRec different from most recovery tools: it does not depend on the file system being intact.
Most undelete utilities read the file system metadata to find deleted file entries. When the file system itself is corrupted, those tools fail. PhotoRec skips the file system entirely and reads raw data blocks, looking for known file headers (the “signature” in “signature-based recovery”). That means it can recover files even when the partition table is damaged, the filesystem is unrecognizable, or the drive was reformatted with a different filesystem than the original.
During setup, PhotoRec asks you to choose between “ext2/ext3/ext4” and “Other” as a filesystem hint. If you know the drive was formatted as ext4 (Linux), pick that option. For everything else (NTFS, FAT, exFAT, HFS+, or anything you are not sure about), pick “Other.” The hint helps PhotoRec optimize its scan but is not strictly required for recovery to work.
Can it recover from a formatted or corrupted partition?
In many cases, yes. Formatting a drive usually erases the directory structure but does not immediately overwrite every data block. A “quick format” on Windows, for example, just clears the file allocation table. The actual file contents remain on the disk until new data takes their place. PhotoRec can scan those leftover blocks and pull out whatever it recognizes.
A full format is harder because some operating systems write zeros across the drive. If you did a full format on a modern version of Windows, recovery rates drop significantly. On older Windows versions or on Linux (where mkfs does not zero the entire drive by default), a full format often leaves data recoverable.
For corrupted partitions where the filesystem metadata is damaged but the drive still spins, PhotoRec is one of the better options. It does not need a working directory tree. The tradeoff is that you lose original file names and folder structure. Recovered files come out with generic numbered names, sorted into folders by type. You will need to manually sort through the results to find what you need.
Usage and troubleshooting
Why does PhotoRec recover files with generic names?
This is the most common complaint, and it is actually by design. PhotoRec recovers files by reading raw data blocks and matching them against known file signatures (headers and footers). It does not rely on the original directory structure, which means it has no way to know what the file was called or which folder it lived in.
Recovered files get numbered names like f0012345.jpg and are sorted into folders (recup_dir.1, recup_dir.2, etc.) based on when they were found during the scan. Each folder typically holds around 500 files before a new one is created.
To make sense of the output, sort by file type first, then by date modified or file size. For photos, most image viewers can display thumbnails so you can visually scan through the results. For documents, the file content is intact even if the name is gone, so you can open them and check the contents manually. Some users run a batch renaming tool afterward to organize recovered files by EXIF date, creation timestamp, or file hash.
Where should I save recovered files?
Always save to a different physical disk or partition. This is the single most important rule in data recovery, and the one people break most often.
If you write recovered files back to the same drive you are scanning, you risk overwriting the deleted data that has not been carved yet. PhotoRec reads the source in a sequential pass. If your destination folder sits on the same drive, the act of writing recovered files creates new data that can land on top of blocks PhotoRec has not scanned yet. The result: partial recoveries, corrupted files, or files that simply disappear mid-scan.
Good destination options: a second internal hard drive, an external USB drive, a network share, or a different partition on a separate physical disk. Make sure the destination has more free space than you expect to recover. PhotoRec will write everything it finds, including fragments and false positives, so the output is often larger than the data you actually need.
Can I limit the scan to certain file types?
Yes, and you probably should. Before starting a scan in PhotoRec, open the File Opt screen. It shows a list of every file family the tool can recognize. By default, all families are enabled. You can toggle individual families on or off with the spacebar.
Narrowing the list helps in two ways. First, the scan produces fewer results to sort through. If you only need JPEG photos from an SD card, there is no reason to also recover ZIP archives, MP3 audio, and PDF documents from the same scan. Second, a focused scan can run faster because PhotoRec spends less time matching against signatures you do not care about.
A practical approach: run one focused pass for the file types you need most (photos, for example), review those results, then run a second pass for other types if needed. This keeps each batch of recovered files manageable instead of dumping everything into one massive pile.
What if the scan finds too many unusable files?
This usually means one of three things: the drive has been heavily reused since the deletion, you left too many file families enabled, or you scanned the whole partition when free-space-only would have been enough.
Start troubleshooting by checking your scan settings. Open File Opt and disable file families you do not need. If you only want photos, turn off everything except image formats. Next, confirm you selected the correct partition. Scanning the wrong partition is more common than people admit, especially on drives with multiple volumes.
If the problem is genuinely too many false positives (files that recover but are corrupted or partial), that points to heavy reuse of the disk. When new data has been written over old blocks, PhotoRec still finds partial file headers and tries to rebuild them. The resulting files might be technically valid but contain garbage data. You can reduce this noise by limiting your scan to free space only, which skips sectors currently in use by the file system.
After recovery, sort the output by file size. Files under 1 KB are usually fragments. Files that are exactly the expected size for their type (like a standard JPEG) are more likely to be intact. A quick preview pass through the results saves time compared to opening every file individually.
How long does a PhotoRec scan take?
It depends on the size of the drive, the connection speed, and how many file types you are scanning for. A 32 GB SD card over USB 3.0 usually finishes in 10-30 minutes. A 500 GB external hard drive can take 2-4 hours. A 2 TB internal HDD might run for 6-12 hours or more.
SSDs tend to scan faster than spinning hard drives because they have no physical seek time. USB 2.0 connections are noticeably slower than USB 3.0 for the same drive. If your scan is taking much longer than expected, check your USB port version and try connecting the drive directly rather than through a hub.
You can safely leave PhotoRec running overnight. It does not need user interaction during the scan. If you need to stop early, pressing the quit key saves progress, and some partial results will already be in the output folder. But a complete scan gives the best results, so let it finish if possible.
Compatibility and alternatives
Is PhotoRec free and safe to use?
Yes on both counts. PhotoRec is open source under the GNU GPL v2 or later, which means there is no trial version, no recovery cap, and no paid unlock hiding the actual functionality. The full recovery engine is available from the first run.
On the safety side, PhotoRec scans the source drive in read-only mode. It does not modify, repair, or write anything to the disk being analyzed. All recovered files go to a separate destination folder you choose before the scan starts. This read-only approach makes it one of the safer recovery tools available because there is no risk of the tool itself making things worse on the damaged drive.
The one safety consideration is where you get the software. Always download from the official CGSecurity website. Third-party download sites sometimes bundle PhotoRec with adware installers or outdated versions. The official package is a clean zip file with no bundled extras.
Does it work on Linux, macOS, and BSD systems too?
Yes. Official packages are available for Linux (x86_64, kernel 2.6.18+), macOS (Intel 64-bit, with Apple Silicon support through Rosetta), FreeBSD, NetBSD, OpenBSD, and Solaris. Many Linux distributions also include PhotoRec in their package repositories, so you can install it with your package manager (apt, dnf, pacman) rather than downloading the archive manually.
On Linux, running PhotoRec with sudo gives you access to physical drives (/dev/sda, /dev/nvme0n1, etc.). On macOS, you may need to grant Terminal full disk access in System Settings before PhotoRec can see all attached volumes. The macOS Gatekeeper may also block the first launch since the binary is not notarized by Apple. Right-click the executable and choose “Open” to bypass that warning.
For emergency recovery from a dead system, many Linux live USB distributions (like SystemRescue or Ubuntu live) include PhotoRec or let you install it on the fly. Booting from a live USB avoids mounting the damaged drive’s partitions, which is exactly what you want during recovery.
How is PhotoRec different from TestDisk?
They solve different problems, which is why CGSecurity ships them together in the same package.
TestDisk repairs partition tables, rebuilds boot sectors, and restores filesystem structures. If your drive is not showing up in Windows or a partition disappeared, TestDisk can often fix the issue without losing data. It works at the partition and filesystem level.
PhotoRec recovers individual files by signature. When the filesystem is too damaged for TestDisk to repair, or when the files were deleted and the directory entries are gone, PhotoRec can still pull files off the raw disk. It works at the data block level.
A common recovery workflow: try TestDisk first to see if the partition structure can be repaired. If that works, your files come back with their original names and folders intact. If TestDisk cannot fix the partition, switch to PhotoRec to extract whatever files it can find by signature. You lose file names and folder structure, but you keep the actual file content.
Is there any reason to choose a paid recovery tool instead?
Sometimes, depending on what you value. Paid recovery tools like R-Studio, Disk Drill, or EaseUS Data Recovery often include features that PhotoRec does not: file preview before recovery, original file name preservation (when the filesystem metadata is partially intact), RAID reconstruction, disk imaging with bad-sector handling, and visual interfaces with progress indicators.
PhotoRec is stronger on raw file carving. When the filesystem is completely gone and you just need to pull files off a dead drive, PhotoRec often recovers more file types than consumer-grade paid tools because its signature database is large and the carving engine is mature.
For home users recovering vacation photos from an SD card, PhotoRec is hard to beat because it costs nothing and the recovery is straightforward. For corporate environments where you need chain-of-custody documentation, RAID support, or the ability to preview files before committing to recovery, a paid tool may justify its price. The best approach for critical data: try PhotoRec first (it is free and read-only), then consider a paid tool if the results are incomplete.
What is the current stable version?
The current stable release is PhotoRec 7.2, published on February 22, 2024. This is the version included in the download links on this page.
A beta version labeled 7.3-WIP (work in progress) is also available on the official CGSecurity download page. The beta includes newer file signature updates and bug fixes that have not yet been promoted to a stable release. For most users, the stable 7.2 build is the safer choice. If you are dealing with a newer file format that 7.2 does not recognize, or you hit a bug during scanning, trying the 7.3-WIP beta is worth a shot.
Check the CGSecurity download page directly if version accuracy matters for a forensic case or a time-sensitive recovery job. Version numbers in the archive file name (testdisk-7.2.win64.zip, for example) confirm exactly what you are getting.